Wednesday, 30 October 2013

Jam Jar Pumpkins!


As soon as I saw this idea on Red Ted Art I made a mental note to try it ourselves. It combines two of Poppet's loves - glue and candles - so I knew it would capture her interest.

To make your pumpkin lantern, you will need a clean jam jar, orange tissue paper, black paper, a tea light candle (real or battery powered), watered down PVA glue and a paintbrush to apply it.


They really could not be easier to make. Start off by painting a layer of glue all over the jam jar, then cover the entire area with scraps of orange tissue paper.


Once you have covered all the glass, paint on another layer of glue to smooth all the tissue paper down, and then stick on a second layer of tissue paper. Apply another coating of the glue (this is the third and last!) to seal it all in and smooth it all down.


Finally, stick the bits of black paper in position to form the face, and paint some glue over the top of them to seal.


The finished luminaries are so simple, but look so cool when lit. A great alternative to the traditional pumpkin with the added benefit that they can be reused year after year!

The girls have enjoyed having dinner by flickering candlelight the last couple of days!


Poppet: 2 yrs 9 mos
Little: 1yr 1mos

Tuesday, 29 October 2013

Monster Playdough


This was more halloween based fun and a really easy activity that kept Poppet happy for ages. Instead of monsters another idea would be to make playdough spiders

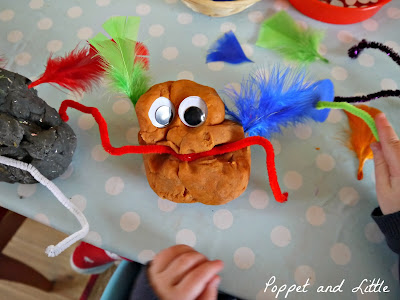
For this activity I put out the halloween playdough that we made recently along with some pipe cleaners, feathers and goggly eyes. Goggly eyes are one of Poppet's favourite crafting supplies, she just loves them and they are really cute.

Mummy Monster

The first monster she created was a 'mummy' one and this was followed by a 'daddy' one and then two cute little baby ones. It is funny how she always exactly replicates our family unit!  Poppet is very methodical with her goggly eye use now - she makes sure she picks two eyes the same size for each face, and is careful to give the babies little eyes and the adults big eyes (with the daddy having the biggest eyes and the mummy slightly smaller ones). She refused point blank to add a third eye on to any of her monsters, no thanks, I'm not falling for that one mum.

Daddy Monster

She stuck feathers in and declared that they were wings and her monsters could fly. She chose to use the pipe cleaners as mouths.  For the baby monsters she very carefully selected the very smallest feathers. It was also very important that the babies were given 'cots' and 'highchairs'.


Baby Monsters 

I found it interesting to compare Poppet's monsters to one she created much earlier in the year; she was much less strict with her eye usage back then! This particular monster had three eyes (third one is at the back) and two lollipop stick arms on top of his head.


Poppet: 2 yrs 9 mos
Little: 1yr


Saturday, 26 October 2013

Halloween Playdough


I think this may be the pinnacle of our playdough making! We made a batch of clove scented playdough using our usual recipe from The Imagination Tree, and then divided it into two balls. We coloured one orange (using red and yellow food colouring) and the other black and added some silver glitter as well. As usual I had to use a lot of food colouring. I have since read that some people use a squirt of a washable ready-made paint and that gives more vibrant colours so I think I will give that a try next time.

The smell of cloves was amazing (we just sprinkled ground cloves into the playdough mixture till it smelled right), very autumnal and warming. Perfect for playing with on crisp autumn days!


The resultant playdough, still warm and fresh from the bowl, enticed Poppet to play with it as soon as I put it out. It was really pliable and aromatic and I think she really liked having more than one colour to work with. 


I paired the playdough with a selection of our autumn treasures - acorns, sycamore seeds, pinecones, and leaves - and also put out a little bowl of whole cloves and some playdough utensils.


She used the lumps of playdough to stand up the twigs in to make little trees, so I showed her how to use balls of playdough to make the tree bigger and taller, adding in more branches. She really likes using the 'knife' and happily cut away at the playdough for ages (although insisted on using the knife upside down).


She experimented with making imprints in the playdough with the acorns and cones and seeing the shapes that they left behind. She was calling the acorn's cupules 'hats' and liked standing the acorns up in the playdough and then making sure they had a hat on. 


I thought to give her our recently decorated peg people, so we added them to our play and she had great fun fitting them all with their hats.


Grandad came in from working outside and assisted by showing Poppet that she could use little lumps of playdough to secure the hats to the heads.

Hatted people having a chinwag

The people had to have beds, of course, so Poppet tasked Grandad, Daddy and me with each making a bed for them. We all produced a bed, some more inventive, realistic and well just better than others but I won't name any names. All I will say is Poppet picked mine as the best and it had detachable covers and a pillow.


It was too hard to resist playing with the playdough and I also created a little garden and then a pumpkin which Poppet loved and insisted I made another. All afternoon she treasured those pumpkins along with the bed that I had made her.


They were all placed very carefully in her play kitchen cupboard and she was very insistent that I didn't put them away "Don't tidy this one mum. I love it mum. Don't tidy it up. I love it. Just look. Just leave it here. Don't tidy that up. I love it." She is at a stage just now where she declares her love for quite a lot of things!

Poppet's beloved objects. Please note the bed looked better when I first made it!

I am sorry to say that Grandad and Daddy's interpretations of a bed were placed in her other kitchen cupboard and I was given permission to tidy these up if I so wished.

This has been by far Poppet's favourite playdough and she has asked for it out to play more than any other I have made. I'm looking forward to making some Christmassy flavours in a few weeks!

Poppet: 2 yrs 9 mos
Little: 1yr

Monday, 21 October 2013

Pumpkin Pictures

With Halloween approaching at the end of the month our activities have been taking on a pumpkiny feel to them.

As the girls are still so young I have deliberately kept things quite innocuous. Even when they are older I won't like things too spooky! We have been reading halloweeny theme books - The Owl That Was Afraid of the Dark, Winnie the Witch and Room on the Broom. All have become instant favourites.

We check on our pumpkin patch every couple of days - we have two big pumpkins (well, coconut sized ones and they are still green so I think we will still need to make a trip to the supermarket to buy a pumpkin for carving!). We made a 'bed' for them by placing some dried shrub branches under them to prevent rotting and Poppet likes to wash them if they get a bit dirty.


For our first piece of pumpkin art I cut out a pumpkin from orange card and then gave it to Poppet along with some orange tissue and paper. Together we glued on little bits all over the pumpkin until it was covered, being careful not to overlap any onto the eyes, nose or mouth holes.


I had a large bit of card left over from cutting the pumpkin out which she insisted was a crown and had to be stuck onto the pumpkin's head. We finished by mounting it onto some black card and sticking some green bits of paper on to the stem. Poppet loves glue so she really liked making this pumpkin picture.


For our second picture I gave Poppet a paper plate, scraps of orange papers again, and also black cut outs of eyes, a nose and a mouth. I left her to making a pumpkin of her own design; she decided to go straight for the black bits and gave the pumpkin plate a face, while the orange scraps were left. She added some orange pen and ta da! -the pumpkin was finished. 


Poppet: 2yrs 9 mos
Little: 1yr

Saturday, 19 October 2013

Decorating Peg People


I bought a wooden peg people family a while ago; they have been used occasionally in play-dough play but I thought they would get a lot more use if we gave them a bit of a character and so one day we set upon them with our felt tip pens. Poppet loved having something new that she was allowed to draw on and spent a very long time trying to colour in every inch of bare wood and draw a face on it. She didn't really deviate from using the purple pen, so we ended up with a purple-haired and purple-dressed daddy one and little boy one. The other three were my handiwork which you obviously already deduced from the far superior art work.


We just used our washable felt tip pens which means that the colours tend to smudge and transfer when handled by dribbling, sticky-handed children. But the family is still fit for purpose. Maybe when she is a bit older we could try using fine-tip permanent markers, and scraps of fabrics and glue to clothe them.

I was instructed to draw the face on the daddy one, where she specified to make him 'sad' and to 'put glasses on' him. I prefer to think that this was due to her creative and imaginative mind rather than  because of any deep-seated issues.

Our little weird looking family

One day I would love to create a peg people version of our entire families for the girls to use in their play, like this one! Little peg Nana and Grandad, peg Grandma and Papa, and all of their many aunties and uncles. I think it would be very cute and funny to watch the imaginary scenarios that they would come up with! Although at this stage I think it would mostly consist of Poppet pleading with her sister "don't eat Uncle Mike!"

Poppet: 2yrs 9 mos
Little: 1yr

Friday, 18 October 2013

Pasta Art


Pasta art is a great cheap art activity, all you need is glue and paper and then whatever dry ingredients you have in your pantry. In fact you don't even need to just stick to pasta - we used rice, sunflower seeds, popcorn kernels and lentils as well as spaghetti, fusilee and penne pasta. 


Because of all the different textures it's also a good sensory activity as well as a creative one. We decided to try and make flowers; I had a book open at a picture of a flower for reference. Poppet liked deciding which foods to use for the 'stem' and 'petals' but mostly just liked spreading lots of glue everywhere!


Poppet: 2yrs 9mos
Little 1yr

Thursday, 17 October 2013

A Very Hungry Caterpillar Party


To celebrate Little's First Birthday we had a Very Hungry Caterpillar party, which was extremely easy to decorate and cater for, because the menu was all laid out for me in the book, and we basically just accessorised with butterflies!

Obviously Little is too young to voice any of her own opinions as to her preferred party theme so I chose the theme for her, but I wanted her to be excited on the day and recognise the images, so in the run up to her birthday I read The Hungry Caterpillar book to Little every day. I'm not sure if this made any difference to her! I consulted the book a lot on matters of party menu, decorations, invitations and so on, so Poppet started referring to it as Little's "party book", and still does, although now according to her she is planning a party for Monkey.


For the party menu we served up all of the food that the caterpillar eats in the book -so we had apples, pears, plums, oranges, strawberries, watermelon, pickles, cocktail sausages and so on. We had a platter of different types of 'Swiss' cheese including Gruyere, Jarlsberg and Emmental, and another platter with a selection of salami. And lots of nice breads to eat it all with. It was a great finger-food menu that really suited little ones.


The lollipops were parmesan crisp lollies made by Aunty Jenny, who must have psychically realised that my own lollies (dark chocolate ones) hadn't turned up in the grocery delivery I had organised. The strawberries were chocolate dipped (also by Aunty Jenny). For ice creams, I found some bubble blowers in the shape of ice cream cones which solved the whole how-do-I-serve-ice-cream-without-it-melting-everywhere conundrum.

The Very Hungry Caterpillar food labels were very helpfully and kindly made available for download from this site, I just had to print them out and laminate them and then stick them onto kebab sticks.


Our 'cupcakes' were fairy cakes decorated with butter icing and rice paper toppers featuring a cute baby photo of Little! Poppet was initially quite disconcerted about eating her sister's face but soon got used to it. The 'chocolate cake' was expertly crafted by Uncle Mike using swiss rolls and a complex system of dowels and rods (the joiner in him) to create a caterpillar.


Little's birthday cake was a vanilla sponge sandwiched with raspberry jam and buttercream, with fondant icing and sugarcraft decorations (and some smarties around the bottom).


I made the caterpillar cake topper following these instructions, and then the other foods around the cake I made following the tutorials here, here and here. I made the decorations in one afternoon with Poppet; she was using playdough and I had the sugarpaste; she realised that she had the raw deal though and kept asking to "swap mum". 


I saw this balloon caterpillar idea on Pinterest and thought it was really simple but effective; Aunty Anna and Grandad cleverly put it together for us. Some party-goers didn't realise that it was a caterpillar, they shall remain nameless!


We decorated the room with some butterfly garlands as well - one paperchain butterfly garland that I have already blogged about making, and the other I made by cutting out butterflies from lots of different  sheets of coloured paper and then glueing two together with ribbon in the middle. Better instructions are here.


We also had a paperback copy of the Very Hungry Caterpillar book for people to leave a message in for Little to have as a keepsake from her first birthday. It was a lovely birthday party and it's nice to have it all written out for us to remember the details!

Poppet: 2 yrs 9 mos
Little: 1 YEAR!

Monday, 14 October 2013

Bead Butterfly

More butterfly themed crafting! This butterfly was really easy to make and the threading of the beads onto the pipecleaners was a good activity for Poppet to strengthen her hand eye coordination and fine motor skills. 


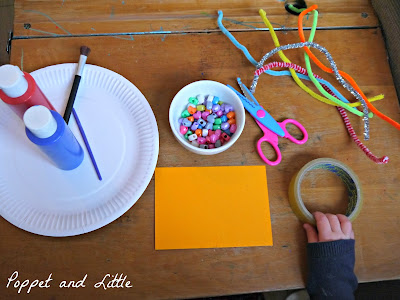
The instructions for how to make this are in our 'Make with Maisy' book.  It was a nice little project for us to work on together while Little was sleeping. To make it you need:

A piece of card
Scissors
Cellotape
Paint
3 pipe cleaners
Beads

Start by cutting a butterfly body from the card and painting it.


While this is drying, thread the beads onto two pipe cleaners (twist the end a bit so they don't fall off).


Bend one pipecleaner to form the bottom wings and the other pipecleaner to form the top wings and tape to the body.

For the antennae, bend a pipecleaner in half and tape to the head. Thread on one bead at each end and then curl the ends. Tada!


This was a much loved butterfly until the day that Little pulled the wings off. 

Poppet: 2yrs 9mos
Little: 1yr

Thursday, 10 October 2013

Butterfly Garland

I wanted some decorations for Little's Hungry Caterpillar themed birthday party and thought a paper butterfly garland would be pretty. It turned into a great art activity for Poppet! I found a butterfly template online (as I am terrible at drawing) and used this to trace a butterfly onto a thick wad of paper (wallpaper lining) that I had accordion folded. It was really thick and hard to cut but Poppet loved her butterflies "holding hands" and she really enjoyed having something different to paint. 


I put our wipe-clean tablecloth on the floor to give her a surface to work on along with all our painting utensils and a variety of colours of paint. This was different from our usual painting set up and made a very inviting invitation to create. Poppet was completely absorbed by it.


Halfway through painting the butterflies she got distracted by painting her hands and feet so they were "all lovlee and sparklee, look mum!"; she spent ages painstakingly covering every inch of her hands and feet with her beloved glittery paint. Once she was happy with her level of sparkliness she returned to decorating the butterflies.


I helped decorate a few butterflies (I hope it is obvious which ones have benefited from adult input), and then Poppet made sure there was no white paper still showing with her finishing touches. 


They looked beautiful and Poppet had a great afternoon making them. I would say it was her favourite painting project yet and she can been asking to do painting lots more since we did them.

They made a nice addition to the fireplace at Little's birthday party and I plan to put them up in the girls' bedroom, they are just too nice to put away!


Poppet 2 yrs 9mos
Little: 1yr