Showing posts with label art. Show all posts

Tuesday, 4 February 2014

Heart Printing


As part of operation wean-Poppet-from-TV (alternatively titled I-can't-watch-Cinderella-again) I brought out the paint to do some Valentine themed printing using things I had around the house. Poppet was delighted to do some painting, as was Little who joined in and DIDN'T TRY TO EAT THE PAINT! This was a momentous occasion indeed. Maybe she learnt her lesson from the last time she took a mouthful of paint, maybe she just wasn't hungry that afternoon, who knows.


I had a heart shaped metal biscuit cutter, a toilet roll tube I bent into a heart shape, a sponge heart and a rubber in the shape of a heart (this was rubbish). They both happily made heart prints onto their sheets of paper, Little even managed a few recognisable heart prints until she got both her hands in and just went with hand smearing instead.


They did sheet after sheet, and eventually Poppet just decided to rub red paint over entire sheets of paper - some kind of snub against the commercialisation of Valentine's Day perhaps?! I also managed to make a wee Valentines card for J (unique declaration of love and also saved myself £2.50).


Poppet: 3yrs
Little: 16 mos


Thursday, 30 January 2014

Crayon Resist Thank You Cards


January is a busy month for thank you cards here, with Christmas and then very shortly thereafter Poppet's birthday. In the past we have made cards out of doodles the girls have made, hand prints, foot prints, even bum prints! This year I decided to make some crayon resist art with Poppet and turn it into cards. It was really simple and she loved making them (It was also good for helping her recognise the number 3!).


I made lots of cards from cream card and with a white crayon drew number 3s, letters, and a few hearts to mix things up a bit. They have shown up a bit on the above picture because of the flash on the camera but you couldn't actually see the crayon at all so as far as Poppet was aware these were blank cards.


I gave her the pile of cards, a little palette of watercolour paints and a bowl of water (the bowl of water had to be changed often because it kept getting 'dirty').


Poppet painted the first card, and as before her very eyes a number 3 appeared, she was very excited and proud of herself! As each card revealed something she would call me through to look at it "look mum I did another three!' or "I did an S for dandad!" (Dandad is called Stephen so she is not entirely wrong!). Eventually when she saw the image come through the paint she would try very hard to colour it in with the paintbrush- sometimes her vigorous painting efforts would win over the repelling effects of the crayon!


She sat at the desk painting every card, and there were quite a few as we have big families! Sometimes I have to cajole her to continue when making cards but not this time. Crayon resist added a little bit of magic to her painting and was a bit hit!

Poppet: 3yrs
Little: 16 mos

Friday, 8 November 2013

Pumpkin Painting


This is the pumpkin that we managed to grow against the odds (it is the small green one on the left). It was a bit too small to carve and we didn't want to eat it as I wasn't sure green ones would taste very good.

So the only logical use left for it was to paint it. The idea appealed to Poppet a lot.


I gave her a selection of acrylic paints and brushes along with the pumpkin and left her to make it beautiful. She loved using the pumpkin as a canvas and was completely absorbed in making sure she painted every bit of it.


The finished pumpkin sits proudly on the windowsill for all to admire.


I don't know of any better use of the twinkling facility on my camera than this.

Poppet: 2yrs 9mos
Little: 1yr 1mos

Monday, 21 October 2013

Pumpkin Pictures

With Halloween approaching at the end of the month our activities have been taking on a pumpkiny feel to them.

As the girls are still so young I have deliberately kept things quite innocuous. Even when they are older I won't like things too spooky! We have been reading halloweeny theme books - The Owl That Was Afraid of the Dark, Winnie the Witch and Room on the Broom. All have become instant favourites.

We check on our pumpkin patch every couple of days - we have two big pumpkins (well, coconut sized ones and they are still green so I think we will still need to make a trip to the supermarket to buy a pumpkin for carving!). We made a 'bed' for them by placing some dried shrub branches under them to prevent rotting and Poppet likes to wash them if they get a bit dirty.


For our first piece of pumpkin art I cut out a pumpkin from orange card and then gave it to Poppet along with some orange tissue and paper. Together we glued on little bits all over the pumpkin until it was covered, being careful not to overlap any onto the eyes, nose or mouth holes.


I had a large bit of card left over from cutting the pumpkin out which she insisted was a crown and had to be stuck onto the pumpkin's head. We finished by mounting it onto some black card and sticking some green bits of paper on to the stem. Poppet loves glue so she really liked making this pumpkin picture.


For our second picture I gave Poppet a paper plate, scraps of orange papers again, and also black cut outs of eyes, a nose and a mouth. I left her to making a pumpkin of her own design; she decided to go straight for the black bits and gave the pumpkin plate a face, while the orange scraps were left. She added some orange pen and ta da! -the pumpkin was finished. 


Poppet: 2yrs 9 mos
Little: 1yr

Saturday, 19 October 2013

Decorating Peg People


I bought a wooden peg people family a while ago; they have been used occasionally in play-dough play but I thought they would get a lot more use if we gave them a bit of a character and so one day we set upon them with our felt tip pens. Poppet loved having something new that she was allowed to draw on and spent a very long time trying to colour in every inch of bare wood and draw a face on it. She didn't really deviate from using the purple pen, so we ended up with a purple-haired and purple-dressed daddy one and little boy one. The other three were my handiwork which you obviously already deduced from the far superior art work.


We just used our washable felt tip pens which means that the colours tend to smudge and transfer when handled by dribbling, sticky-handed children. But the family is still fit for purpose. Maybe when she is a bit older we could try using fine-tip permanent markers, and scraps of fabrics and glue to clothe them.

I was instructed to draw the face on the daddy one, where she specified to make him 'sad' and to 'put glasses on' him. I prefer to think that this was due to her creative and imaginative mind rather than  because of any deep-seated issues.

Our little weird looking family

One day I would love to create a peg people version of our entire families for the girls to use in their play, like this one! Little peg Nana and Grandad, peg Grandma and Papa, and all of their many aunties and uncles. I think it would be very cute and funny to watch the imaginary scenarios that they would come up with! Although at this stage I think it would mostly consist of Poppet pleading with her sister "don't eat Uncle Mike!"

Poppet: 2yrs 9 mos
Little: 1yr

Friday, 18 October 2013

Pasta Art


Pasta art is a great cheap art activity, all you need is glue and paper and then whatever dry ingredients you have in your pantry. In fact you don't even need to just stick to pasta - we used rice, sunflower seeds, popcorn kernels and lentils as well as spaghetti, fusilee and penne pasta. 


Because of all the different textures it's also a good sensory activity as well as a creative one. We decided to try and make flowers; I had a book open at a picture of a flower for reference. Poppet liked deciding which foods to use for the 'stem' and 'petals' but mostly just liked spreading lots of glue everywhere!


Poppet: 2yrs 9mos
Little 1yr

Monday, 14 October 2013

Bead Butterfly

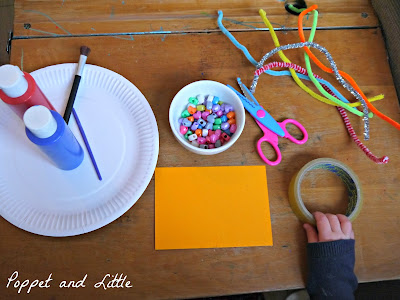
More butterfly themed crafting! This butterfly was really easy to make and the threading of the beads onto the pipecleaners was a good activity for Poppet to strengthen her hand eye coordination and fine motor skills. 


The instructions for how to make this are in our 'Make with Maisy' book.  It was a nice little project for us to work on together while Little was sleeping. To make it you need:

A piece of card
Scissors
Cellotape
Paint
3 pipe cleaners
Beads

Start by cutting a butterfly body from the card and painting it.


While this is drying, thread the beads onto two pipe cleaners (twist the end a bit so they don't fall off).


Bend one pipecleaner to form the bottom wings and the other pipecleaner to form the top wings and tape to the body.

For the antennae, bend a pipecleaner in half and tape to the head. Thread on one bead at each end and then curl the ends. Tada!


This was a much loved butterfly until the day that Little pulled the wings off. 

Poppet: 2yrs 9mos
Little: 1yr

Thursday, 10 October 2013

Butterfly Garland

I wanted some decorations for Little's Hungry Caterpillar themed birthday party and thought a paper butterfly garland would be pretty. It turned into a great art activity for Poppet! I found a butterfly template online (as I am terrible at drawing) and used this to trace a butterfly onto a thick wad of paper (wallpaper lining) that I had accordion folded. It was really thick and hard to cut but Poppet loved her butterflies "holding hands" and she really enjoyed having something different to paint. 


I put our wipe-clean tablecloth on the floor to give her a surface to work on along with all our painting utensils and a variety of colours of paint. This was different from our usual painting set up and made a very inviting invitation to create. Poppet was completely absorbed by it.


Halfway through painting the butterflies she got distracted by painting her hands and feet so they were "all lovlee and sparklee, look mum!"; she spent ages painstakingly covering every inch of her hands and feet with her beloved glittery paint. Once she was happy with her level of sparkliness she returned to decorating the butterflies.


I helped decorate a few butterflies (I hope it is obvious which ones have benefited from adult input), and then Poppet made sure there was no white paper still showing with her finishing touches. 


They looked beautiful and Poppet had a great afternoon making them. I would say it was her favourite painting project yet and she can been asking to do painting lots more since we did them.

They made a nice addition to the fireplace at Little's birthday party and I plan to put them up in the girls' bedroom, they are just too nice to put away!


Poppet 2 yrs 9mos
Little: 1yr

Wednesday, 2 October 2013

The Very Hungry Caterpillar Birthday Party Invitations

Name blacked out to protect Little's anonymity!

Little has just turned one so we are planning a small birthday party for her. The theme is The Very Hungry Caterpillar and Poppet and I recently spent an afternoon making the invitations. I had looked on Pinterest for some inspiration and some of the offerings were seriously impressive! Ours, not so much, but they were easy and quick to make so I think I get bonus points.

So this is what we did:

I traced the leaf from the back page of the book and made a template from it - I then used this to cut out as many leaves as I needed from some green card (and some construction paper when I ran out of card).


We used a hole punch (it was a double punch but we angled it so it only did one hole at a time) to punch out a few holes along an edge of each leaf. Poppet's favourite activity ever.  I positioned the leaf, she pressed down (very hard!) to punch it. And was very proud of herself. 


Once all the leaves had been punched, I gave Poppet some green, blue and yellow paint (swirled together a bit with a pencil) and some sponges.

The intention was to decorate the leaves with the sponges and paint to recreate the distinctive artwork that appears in the book - kind of splotchy (proper artistic term).


This didn't appeal to Poppet, however, who was most unimpressed with the style of painting when I demonstrated on one leaf. She immediately took over, saying "I clean it!" and scrubbed furiously with the sponge until the entire leaf was uniform, plain, green. A couple of leaves that I did managed to escape without her 'improvements', but the majority were 'cleaned'.

Poppet 'cleaning' my Eric Carle art attempts

She's a very particular little Poppet.

Poppet: 2yrs 8 mos
Little: 1yr


Friday, 6 September 2013

Homemade Rainstick

This is another addition to our do-it-yourself musical instrument collection - Poppet got FAR more enjoyment from making this than she does from actually using it so it tends to stay sat up on the windowsill but it was still worth it for a day of crafting activity!

I saw the instructions for how to make a rainstick over on The Imagination Tree ages ago and kept it in my mind for such a time when I had a cardboard tube available; well I finally framed and hung up a print that had been languishing in a tube in the cupboard for a long time so we gathered our materials together and got started! We used

  • 1 cardboard tube (thick type)
  • small nails (type for hanging pictures)
  • hammer
  • glue
  • craft paper
  • collage bits to stick on
  • split peas and peanuts for the inside (you could use anything you have to hand - lentils, dried beans, rice, pasta etc...)
To start off you simply hammer in the nails at random intervals all around the cardboard tube - the more you use the better it will sound. Poppet was very insistent that she have a go at banging some in so I started them off for her then held the tube while she hit them, being careful to keep her hands away from the nail. She LOVED this.


Once we had finished the inside of the tube looked like this:


We filled the tube up with some nuts and some yellow spilt peas and made sure the lid was sealed very securely. We tried it out and they gave a good sound but I think you would get an even better sound if you used shiny, hard, dried beans like kidney beans or something. We will definitely try this again once I get around to framing some more prints that I have lying around! Then Poppet covered some pieces of paper (she chose pink and purple) in glue and rolled them around the tube to cover it and pressed it all down. It doesn't really matter if it creases as it will get covered in collage bits anyway.


We left it to dry (as usual, copious amounts of glue was used), and then in the afternoon Poppet decorated it with some torn up tissue paper, feathers and foam shapes.


And here she is trying out the finished product. The girls were distinctly underwhelmed by the noise it makes in comparison to the drums we made! But it was free and we had great fun making it!


Poppet : 2 yrs 8 mos
Little: 11 mos

Thursday, 22 August 2013

The Paper Dolls

I think I've found my favourite children's book.

We have quite a few Julia Donaldson books (she of Gruffalo Fame). One of Poppet's favourite books is Monkey Puzzle. So when I saw one that I hadn't heard of before at the library we checked it out straightaway and took it home.


It's a beautiful story with the message that even when precious things are no longer with us, they can live on in our memories. It's the kind of children's book that will put a lump in your throat and a tear in your eye (Guess How Much I Love You anyone?)

It is about a little girl who makes some paper dolls with her mum and then they go on some adventures, and I won't tell you anymore because I don't want to spoil the ending. And I have a bit of a habit for spoiling endings. I will just say that the last few pages are incredible. Because of the message of this book it would be really good for a child coming to terms with any kind of loss (be it a favourite toy or a grandparent) or at the stage of questioning the circle of life.

I will be buying our own copy to keep I love it so much and it would make a lovely present.

Inspired by the book, we sat down one morning to make some paper dolls. I am not very craft-minded so my first attempt didn't go too well! To make them you need to accordion fold a sheet of paper, draw a doll outline on the front then cut it out. Making sure the dolls arms go right to the edges of the paper on each side to make sure the dolls are 'holding hands'. I only did it on one side the first time which resulted in a couple of twosomes.


I finally got it right and let Poppet unfold it to find the dolls holding hands which she was pretty impressed with. 


Then I blu-tacked the dolls to her desk (to stop them moving around) and gave her some paint to decorate them with. She painted some 'dresses' on them all and we left them to dry till the next day (she used a lot of paint!).


The next day she coloured in one of the twosomes with her felt tips and then we taped them to the painted ones so we had a very pretty six-some. But I never got a chance to take a photo because while I was making dinner this happened. 


Poppet took it upon herself to reenact the book. Oh dear I might have just spoiled the ending.

Poppet: 2yrs 7mos
Little: 10 mos

*Update* 2/10/13  I'm not the only one who loves this book, as I discovered the other day that The Paper Dolls has won a Scottish Children's Book Club Award, and free copies are being given to P1 pupils as part of BookBug. It is a really lovely book.


Monday, 19 August 2013

Holiday Collage

Whenever we go for a walk, we help Poppet pick up 'special' things to take home; things like leaves and shells and flowers (and we ditch the 'treasures' that she hands us that aren't so special, mainly a lot of twigs).

Our local library is running a competition over the summer, asking children to create a collage on the theme of 'A Year Of Natural Scotland'. We had been collecting bits and pieces from our travels and holidays this year, so for Poppet's entry she created a collage from them.


The wild flowers were picked by Poppet and her Grandma on the last evening of our holiday at their island home. The weather was not great for our week's holiday there but on that last evening the sun came out and we had a lovely after dinner walk. My favourites are the orchids and cotton grass. Grandma pressed them for us and brought them to our house on her next visit. Poppet was also given the flower press so hopefully we can have a go at some flower pressing some time soon!

Our other collage bits included postcards from each of our Scottish holiday destinations, Poppet's ferry boarding card, some leaves, shells and wheat ears. We used the sturdy cardboard back to an old scrapbook as the base for the collage. I gave Poppet a pot of glue and a spreader and she was off!


She loved the gluing and was completely absorbed in the task in hand. She spent ages at this activity, covering the bits with glue and deciding where to put them. Some of the things didn't glue so well (the shells and big leaves) so I got out some glue dots and she loved using them. They gave her fine motor skills a really good workout! 


Once all the 'treasures' were glued on Poppet was still on a glueing roll and wasn't ready to stop, I had to take the collage away from her to cries of "little bit more!" as I didn't think the masterpiece would benefit greatly from the addition of some coloured foam shapes (it is a competition after all!).

She was pacified by the prospect of glueing shapes onto a ladybird picture (it has been given two star-shaped 'eyes').


The finished collage!


*Update* Poppet won her category and received a £10 book voucher as her prize!